Look what someone was throwing away! Well I pulled my SUV over and threw them in the back...while the former owner was watering her lawn. Can you believe it! I also stopped and chatted with her and told her my plans for her...umm trash.
So far I have sanded them down and painted one. I found outdoor paint on sale at Sears for $2.50. I was just going to paint them white, but when cream is so cheep...cream it is! :)
Now I need to find the prefect outdoor fabric to finish the project (or one that I like just as much on sale)
So stay tuned for the finished results...:)
A little blog about my adventures raising two little boys, keeping my home together, loving my husband, and most of all loving God.
Thursday, July 22, 2010
Tuesday, July 20, 2010
Working on it...
Someone needs more of Mommies time these days. I have been trying to be more creative in my parenting approach, and I feel like I am learning new things every day. My husband and I joke that we were perfect parents...until we actually had our own kids! :)
A few things that I have come up with:
1. There is a stop light posted on my fridge! - This is a simple visual device that I'm using to help J stay on track. :) I took a piece of black construction paper with green, yellow, and red circles glued on to look like a stop light. Then I used a clothes pen and clipped it to the side of the "light" that helps J to see where he is at. I also drew a smiley face on the green circle (great day), a strait face on the yellow (warning), and a sad face on the red (not good). J can earn back a green light with good behavior...or a nap. :) This tool has really helped.
2. The schedule - This is also posted on the fridge. On another piece of construction paper I wrote out J's day. Wake up, get dressed, eat breakfast, table work (preschool activity), free play, lunch, book, nap, etc. I also drew pictures next to each activity since J can't read yet. Then I use a clothes pin to clip on the paper and move it to point to the activity that we are on. I did not put times on the schedule...J does not know time yet either, and I don't want to be held to that strict of a schedule!
3. A shopping list - can you tell I have a visual child! (I'm the same way though, and yet have no picture of this!) I was having a hard time getting my very active little boy sit still while I shop. So I created a shopping list for him to hold on to. We have turned shopping into a fun game of I Spy. Before we go shopping I write out a few of the things that we need to look for in the store and draw pictures to go with each item. This is a great way to talk about colors, shapes, and letters while out. I put this list in a plastic page protector to keep it "safe" through the trip.
If you don't like to draw just use clip art from your computer. Children don't care if your not the worlds greatest artist. They are just happy that they get to play a game!
When all else fails a 50 cent ride at the end of the shopping trip usually does the trick. ;)
A few things that I have come up with:
1. There is a stop light posted on my fridge! - This is a simple visual device that I'm using to help J stay on track. :) I took a piece of black construction paper with green, yellow, and red circles glued on to look like a stop light. Then I used a clothes pen and clipped it to the side of the "light" that helps J to see where he is at. I also drew a smiley face on the green circle (great day), a strait face on the yellow (warning), and a sad face on the red (not good). J can earn back a green light with good behavior...or a nap. :) This tool has really helped.
2. The schedule - This is also posted on the fridge. On another piece of construction paper I wrote out J's day. Wake up, get dressed, eat breakfast, table work (preschool activity), free play, lunch, book, nap, etc. I also drew pictures next to each activity since J can't read yet. Then I use a clothes pin to clip on the paper and move it to point to the activity that we are on. I did not put times on the schedule...J does not know time yet either, and I don't want to be held to that strict of a schedule!
3. A shopping list - can you tell I have a visual child! (I'm the same way though, and yet have no picture of this!) I was having a hard time getting my very active little boy sit still while I shop. So I created a shopping list for him to hold on to. We have turned shopping into a fun game of I Spy. Before we go shopping I write out a few of the things that we need to look for in the store and draw pictures to go with each item. This is a great way to talk about colors, shapes, and letters while out. I put this list in a plastic page protector to keep it "safe" through the trip.
If you don't like to draw just use clip art from your computer. Children don't care if your not the worlds greatest artist. They are just happy that they get to play a game!
When all else fails a 50 cent ride at the end of the shopping trip usually does the trick. ;)
Sunday, July 4, 2010
hanging art
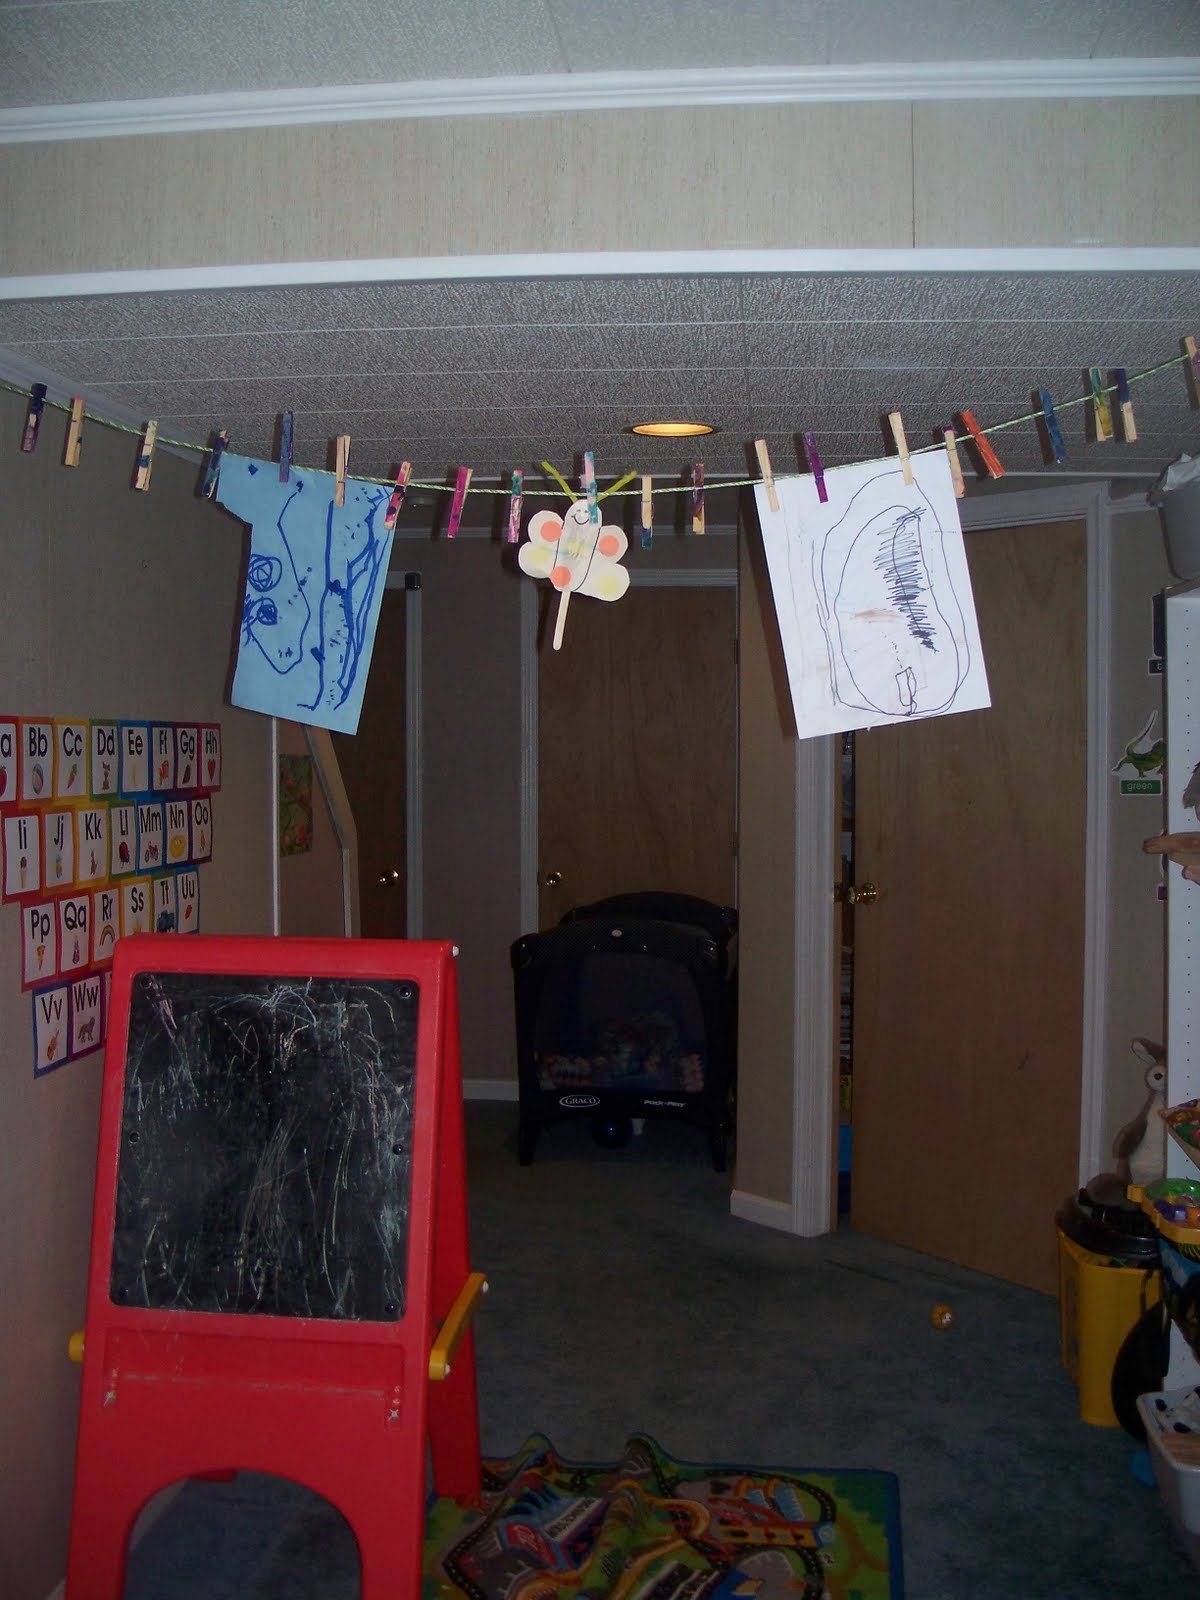
J loves to paint, but I quickly run out of places to hang his pictures so that they can dry. Also, now that baby N can pull himself up onto things some of J's pictures that were hanging on the fridge have been ripped. oops! So I decided to hang them up in the playroom using a clothes line and clips that we found at the Dollar Store.
First J painted each of the clothes pins. Our "painting table" is outside and can be sprayed down when craft time is over. :)
Then we hung up some of his pictures using the dry clothes pins. To hang the clothes line I just nailed two long nails into the wall half way and tied the line to the part of the nail sticking out of the wall. We are not going to be hanging anything heavy on the line so I was not too worried about how well it's hung up.
You can see half of the playroom in this direction. This is the area where we do arts and crafts when the weather does not allow for outside activity.
First J painted each of the clothes pins. Our "painting table" is outside and can be sprayed down when craft time is over. :)
Then we hung up some of his pictures using the dry clothes pins. To hang the clothes line I just nailed two long nails into the wall half way and tied the line to the part of the nail sticking out of the wall. We are not going to be hanging anything heavy on the line so I was not too worried about how well it's hung up.
You can see half of the playroom in this direction. This is the area where we do arts and crafts when the weather does not allow for outside activity.
Wednesday, June 30, 2010
Summer Projects
J and I have enjoyed working on little projects together this Summer. Today we painted a birdhouse together. I allowed him complete freedom to paint it how ever he wanted...purple, green, and blue...why not! He was so cute after we finished, he called out the window "okay birds you can come eat now, your house is painted".
Tomorrow we will look out our window while eating breakfast and see if the birds are eating their breakfast too.
Monday, June 28, 2010
mini biscuits
What's better than a plate of hot biscuits with honey drizzled over the top? Two plates of biscuits! :) My husband offered to stay home with the boys last night so I could do some errands by myself. He's so sweet. So before I left I made up a quick batch of biscuits and heated up some of the turkey noodle soup that I had in the freezer. This way I know they won't eat junk for dinner.
I used the recipe from my Better Homes and Gardens Cookbook...
|3 cups of flour
1 tablespoon baking powder
1 tablespoon sugar
1 tablespoon salt
3/4 teaspoon cream of tartar
3/4 cup butter
1 cup of milk
Preheat your oven to 450 deg. F. In a large bowl combine the dry ingredients. Using a pastry blender, cut in the butter until the mixture resembles coarse crumbs. Make a well in the center of flour mixture. Add milk all at once. Using a fork, stir just until mixture is moist. You don't want to over work your dough!
Turn dough onto lightly flowered surface. Knead dough by folding and gently pressing it for four to six strokes until dough holds together. Roll dough flat until it is one inch thick. To cut the dough use a biscuit cutter...or if you don't have one use what ever clean round thing you have. Ha Ha...
See, I don't have a biscuit cutter so I'm using one of baby N's clean bottles. You have to be creative and use what you have! These made cute mini biscuits.
J wanted to get in on the action too. He loves to help Mommy in the kitchen. :)
Now place your dough circles slightly apart on your ungreased baking sheet. Bake for 10-14 min. or until golden brown.
Remove from oven and serve warm. I also like to drizzle a little honey over mine. :)
By the looks of this picture you would think I never feed my kids. I promise I do! :) J could not wait for the biscuits to come out. Baby N just goes where the food is.
I think these mini biscuits would also work well if you sliced them and turned them into ham sandwiches. Wouldn't that be great for a brunch? I think so. They were also great with my cup of coffee this morning.
So I had a great time shopping and I found several cute things that I will blog about later. yay! The Hubs and the boys had a great time too, especially with nice full bellies.
I used the recipe from my Better Homes and Gardens Cookbook...
|3 cups of flour
1 tablespoon baking powder
1 tablespoon sugar
1 tablespoon salt
3/4 teaspoon cream of tartar
3/4 cup butter
1 cup of milk
Preheat your oven to 450 deg. F. In a large bowl combine the dry ingredients. Using a pastry blender, cut in the butter until the mixture resembles coarse crumbs. Make a well in the center of flour mixture. Add milk all at once. Using a fork, stir just until mixture is moist. You don't want to over work your dough!
Turn dough onto lightly flowered surface. Knead dough by folding and gently pressing it for four to six strokes until dough holds together. Roll dough flat until it is one inch thick. To cut the dough use a biscuit cutter...or if you don't have one use what ever clean round thing you have. Ha Ha...
See, I don't have a biscuit cutter so I'm using one of baby N's clean bottles. You have to be creative and use what you have! These made cute mini biscuits.
J wanted to get in on the action too. He loves to help Mommy in the kitchen. :)
Now place your dough circles slightly apart on your ungreased baking sheet. Bake for 10-14 min. or until golden brown.
Remove from oven and serve warm. I also like to drizzle a little honey over mine. :)
By the looks of this picture you would think I never feed my kids. I promise I do! :) J could not wait for the biscuits to come out. Baby N just goes where the food is.
I think these mini biscuits would also work well if you sliced them and turned them into ham sandwiches. Wouldn't that be great for a brunch? I think so. They were also great with my cup of coffee this morning.
So I had a great time shopping and I found several cute things that I will blog about later. yay! The Hubs and the boys had a great time too, especially with nice full bellies.
Sunday, June 27, 2010
Muthering Heights: Marriage Tips From the Crusie Ship - Installment 2: Energize Your Marriage!
I was a guest over at Muthering Heights. We met on the cruise and had fun chatting about our blogs. I hate seeing myself on video, but it's was a lot of fun to be a part of. Hope you enjoy...or at least get a laugh at me being a goober on film. ;)
Muthering Heights: Marriage Tips From the Crusie Ship - Installment 2: Energize Your Marriage!
Saturday, June 26, 2010
What to do with all the toys!
So I wanted to show you how I have organized some of the boy's toys. We have a finished basement that I turned into a playroom. Most of the boy's toys are down there, but a few need to stay upstairs in the living room. Here is a picture of the book case in the living room.
First I sorted through all the toys and decided which ones I wanted upstairs and which ones needed to stay in the playroom. I also threw away anything that was broken or from a kids meal. I also donated some toys to Goodwill. I did this while J was asleep and got rid of the bags of things that were going away asap. No need for a fight, and he has not even missed a toy!
Then I sorted the living room toys into groups...all the cars together, blocks together, legos, you get the point. Then I went to the store in search of storage containers that I thought would hold up to my boys. I wanted something with a lid and was see-through.
Then I labeled each bin and also added a picture of what was stored inside. My three year old can't read yet so the labels are pointless, but he can see the pictures. It's important for him to learn organizing skills and how to take care of his things.
I organized the books too. My sons favorite ones are in a basket next to the book case. He kept pulling all of them off the shelf when he was searching for the one he wanted. So far having his favorite ones (car books) in a basket on the floor has made his search a lot easier. While I was organizing the books I also threw away any that were missing pages, and donated ones that we did not like or had an extra copy of.
The nice thing about the toys being sorted in their own boxes is that it's easier for J to play. He would dump everything out of a large toy bin in search of one car. Now he just grabs the car box and can see everything that he "needs".
It's also a lot easier for J to clean up. He knows where everything goes now, and I'm a happy Mama because the toys are picked up! :)
I'll show you the playroom later. :)
Subscribe to:
Posts (Atom)